How to calibrate the UV254 COD analyzer

Before calibration
This is the calibration guide of KWS100 COD UV254 online analyzer. The operator should read this guide carefully before any action.
The analyzer normally is calibrated before delivery to the customer, so there is no need to do this unless the bellow conditions occurred.
- The measure result seems obviously abnormal or goes out-of-tolerance.
- The analyzer working inline more than 1 years and the sensor windows goes worn, or the observer in charge want to check if the measure results reliable.
How to prepare the standard calibration reagent of COD UV254 analyzer
Step 1: Prepare potassium hydrogen phthalate powder
Prepare 1.2754 gram absolutely dry potassium hydrogen phthalate powder. It’s better to dehydration the powder by stove under 100℃.
Step 2: Dissolve
Take a 1000ml flask and dissolve the powder in the it, then stir and add pure water to the scale mark
The 1500mg/L UV254-COD standard reagent preparation is finished, which we called Reagent A. Then we can use this reagent to make some lower concentration reagent.
Step 3: Dilution
Dip 50ml Reagent A in the measuring glass, and add pure water (can be replaced by medical distilled water) to 500ml, the 150mg/L UV254-COD standard reagent preparation is finished.
Dip 150ml Reagent A in the measuring glass add pure water to 500ml, the 450mg/L UV254-COD standard reagent preparation is finished.
How to calibrate
The principle
The measure result can be learnt as a linear result of the raw signal
y=K*x+B.
where the K is the Slope coefficient, B is the intercept.
Firt we should change the K =1 and B=0 to get the raw ADC signals and the standard reagent is the standard indicator, so we can solve equations to get the wanted K and B.
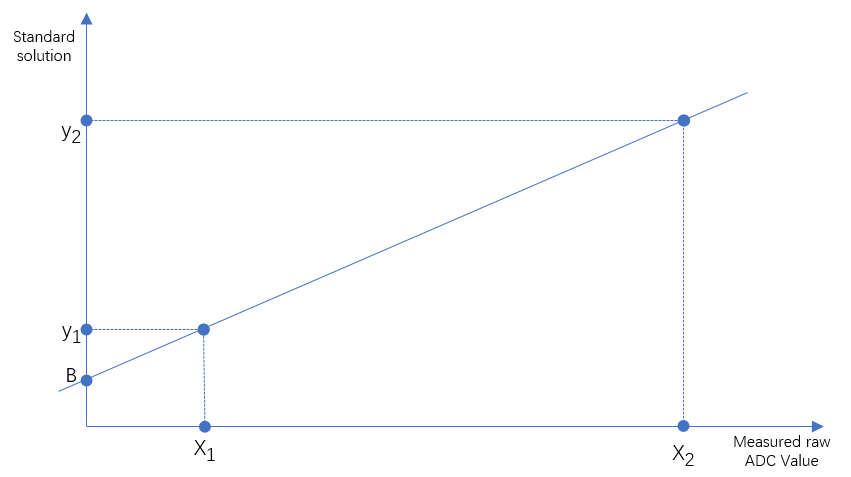
Here is 2 method, one is 1 point calibration and another is 2-point calibration.
as the mainly error comes from K. the B is almost 0.
For 1-point calibration the K =Y/x B=0.
For 2-point calibration the K=(y1-y2)/(x1-x2); and B=y1-K*(x1-x2)
Calibration routine
Step 1: Preparing
Prepare a 1000ml Wash bottle with pure water in it. and several 250ml beakers, a Liquid container warm air gun or a hair dryer, a laptop or PC with the host software, the modscan, Modbus poll or com assistant and host software is acceptable, the USB2RS485 hardware is needed.

Step 2: Initialize
Connect the analyzer with the host and power on.
initialize the UV254 COD analyzer calibration parameter K and B.
Write K=1 and B=0.
The default slave ID in the below example command is 0x01.
Tx:01 10 11 00 00 04 08 00 00 80 3F 00 00 00 00 81 AE
Re-send the command till get the below echo.
Rx:01 10 11 00 00 04 C4 F6, the echo means initialize the K=1 and B=0 succeed.
Step 3: Prepare the standard reagent for calibration
Take 3 250ml beakers paste the label 0mg/L, 150mg/L. we suggest you prepare the 1500mg/L label if the analyzer measurement range is 1500mg/L, and the 450mg/L label if the measurement range is 450mg/L.
Wash the beakers by wash water in the wash bottle, dry the beakers with drier. Pour separately in each beaker 120ml corresponding standard reagent.
Make sure the sensor window completely submerged in the standard reagent but not overflow when the sensor dip in the beaker.
Step 4: Get the original ADC value
Flush the analyzer surface, especially the sensor window, and then dry the analyzer, put the sensor in 1 kind of the standard reagent keep still, read the measure result by send the command 01 03 26 02 00 02 6E 83.
The echo is 01 03 06 AA BB CC DD xx xx (for example: 01 03 04 DB 30 C4 3E 13 C8)
The AABBCCDD ( DB30C43E) is the Single precision floating small endianness point measurement result, use the hex to float software to transfer the value to float(0.383185), record it as X1 and the standard reagent value as Y1on the paper.

Flush the analyzer surface, especially the sensor window, and then dry the analyzer, put the sensor in 1 kind of the standard reagent keep still, read the measure result by send the command 01 03 26 00 00 02 XX XX.
The echo is 01 03 04 AA BB CC DD XX XX
The AABBCCDD is the Single precision floating point small endianness number measurement result, use the hex to float software to transfer the value to float, record it as X2 and the standard reagent value as Y2 on the paper too.
Step 5: Calculate the K and B
According the Linear mathematical formula y=K*x+B. calculate the K and B.
K=(y1-y2)/(x1-x2);
B=y1-K*(x1-x2)
Step 6: Write the K and B in the registers
After calculating the float K and B, apply the same method float to hex transform the single precision floating point number to hex, be sure it’s small endianness and the write the K and B in the register as follows.
For example if the K=1.06, B=0.012
Then we can get the hex by input the 1.06 and 0.012 on the webpage https://gregstoll.com/~gregstoll/floattohex/ to get the result like below in the picture

The 1.06 in the small endianness hex format is 0x14AE873F, so the 0.012 is 0xA69B443C.
So the write command is as below:
01 10 11 00 00 04 08 14 AE 87 3F A6 9B 44 3C AF 5A
Write again if the echo is not 01 10 11 00 00 04 C4 F6. the echo means the K and B updated successfully.
Step 7: Verify calibration results
Check the calibration result by measuring the standard reagent. Be sure each time put in the flushed and dried sensor in the standard reagent each time and then read the measure result by modscan or modbus poll, or other host software.
Try to review all the steps above and re calibrate the analyzer If the measurement results are out of tolerance.
Please contact your supplier or Kacise if you repeat 3 time and cannot get the right result.
Related Guides


